Quick addition to this post: 365 Days of Sewing is now running a giveaway of Sew Retro! Go here to enter the contest and read an interview with me.Anyway, back to the original post . . .Max’s toddler program wrapped up last week, and now he is off to summer camp (at the same school) this week. It’s just three days a week from 9 – 12, but any chance we have to get the kid outside and running around is welcome. He goes for two other weeks during the summer. Not enough, as far as I’m concerned. But my checkbook had the final say.
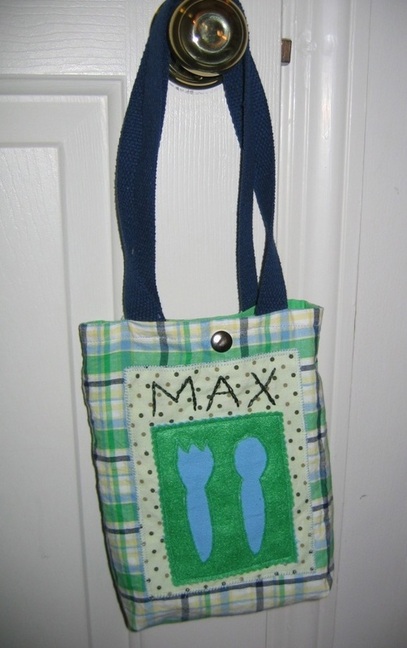
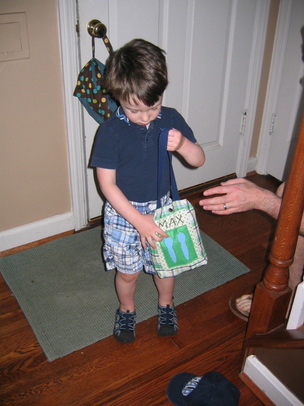
Since the camp includes packing a lunch for the kiddos, I figured it was time that Max had his own lunch bag. So of course, it seemed brilliant to embroider his name right on it so there’s no worry about mixing up lunch bags! 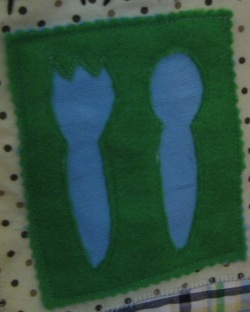 I also wanted to try the reverse applique technique on a small scale. I used a pattern from 100 Applique Motifs, but did the more traditional method of reverse applique—where you stitch on the backside of the fabric you want to show, and then flip it over and cut very close to the stitching on the fabric that’s in front of the motif. I’ve dabbled in this, but never done a project using this method. I love it, because it feels a little magical, like a slow unveiling of something. I used craft felt since I wanted a clean edge versus the frayed look I often gravitate toward.
It’s a super simple shape: I just cut front and back pieces, and then front and back lining pieces, at about 9 inches by 12 inches. I sewed up the sides and bottom of bag and lining, and made about a 1.25-inch gusset in each. I used the method where you insert the lining (turned right-side out) into the bag (turned wrong-side out, so right sides are together) and then sandwiched the handles in the seam. Then I sewed the top edges together, leaving about a 3-inch opening at the top for turning. Finishing is quick: Turn it, press it, slip-stitch the opening closed, top-stitch (if you want), and add a snap fastener (or sew on a snap or use Velcro). However, I realize now that I should have made the handles shorter (so the bag isn’t dragging the ground if he carries it).
I would love to see a dozen or so two- and three-year olds sitting around a table, pulling out goodies from their lunch bags and eating lunch. Actually, I’m 100 percent sure that I wouldn’t be able to handle such a scene. But I am thankful that there are wonderful summer camp teachers out there who are excellent at wrangling children and their yogurt-smeared faces and sticky hands.
Yay for homemade lunch bags, wonderful teachers, and summer treats!
When Bonnie from Fishsticks Designs asked me if I wanted to try her great Charlie Tee & Hoodie pattern , I jumped at the chance! I’m always looking for toddler boy sewing ideas. (On that note, don’t forget to check in at Dana Made It for Celebrate the Boy Month!)
Anyway, Bonnie sent me this pattern for free, but I’m under no obligation to give it a glowing review. I don’t need obligation: this handy little pattern sells itself! I truly, truly love it and I think it’s probably my favorite thing I’ve made for Max so far. The Pattern
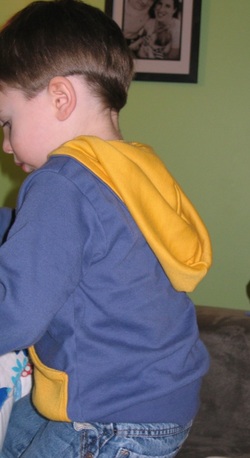
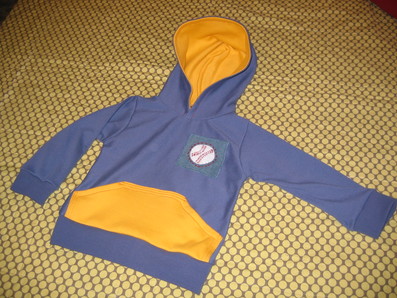
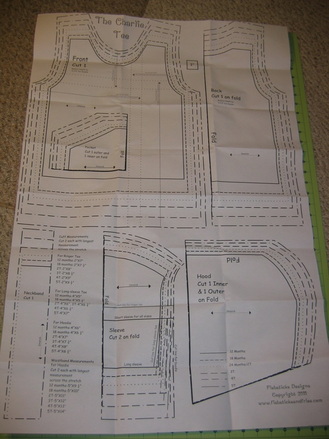
The pattern presentation isn’t fancy (a manila envelope with black and white sheets) [little update here: Bonnie just changed out the packaging! See it here!], but that’s unimportant to me. I’m after functionality and a good pattern, and this definitely delivers. First, it’s about five different patterns in one, because you can customize it for what you want: a plain tee (long or short sleeves), a color-blocked tee, or a hoodie (either outerwear or more like a tee-shirt). I chose the tee-shirt hoodie option, because I wanted Max to have something to wear around for spring that wasn’t too heavy.
She offers the patterns in different sizes (all the way up to adult), and my pattern is for infant/toddlers. There are six sizes: 12M, 18M, 24M/2T, 3T, 4T, 5T
It comes with one big sheet of paper, with all of the sizes clearly printed. The best method is to trace the size you’re making. This way, you don’t have to deal with cumbersome paper when cutting out, and also, you can re-use (I anticipate using this pattern for many years as Max grows!). I used Pellon True-Grid (I just buy this by the bolt at Jo-Ann’s).
The Directions
The directions are very clear. I admit, I didn’t always read them word for word because once you know how to do something your way, you just go ahead and do it without really checking (though I don’t think my way differed from her way). But it would be very appropriate for a beginner. Also, she gives serge directions, if you’re using a serger (I wasn’t). There are accompanying pictures that illustrate the steps, and overall, it’s easy to follow. 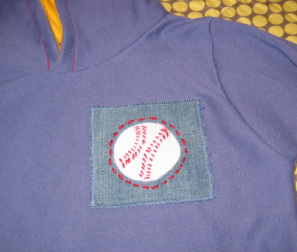
What I Customized
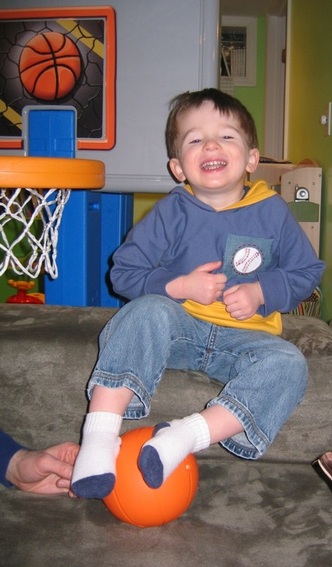
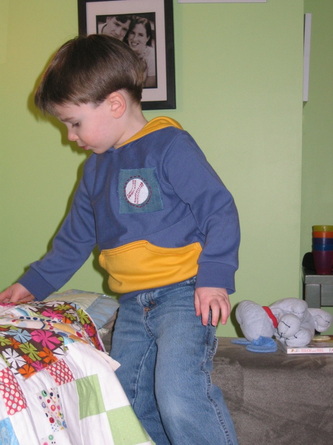
I decided to make a little baseball appliqué. So, this was my addition, there aren’t directions for this in the pattern. But there’s nothing to it: I just cut a piece of white felt into a circle and stitched it (by hand) to a square of denim. Then I took small stitches with a single strand of red yarn to mimic the stitches on a baseball (I actually had to Google images of baseballs to see what a baseball actually looked like!). I made a row of hand stitches with the red yarn just outside the baseball, and then I machine-appliquéd the piece of denim to the front.
I also added more top-stitching to the big yellow pocket, because I wanted to bring out the red. I top-stitched around the hood, too.
 The Overall Fit
I made a 3T for Max, who is 2-1/2 years old, and a little bit on the small side (he’s like 35% percentile in height/weight). It’s just slightly big, but I like that, because there’s room to grow (I think it will still fit him this fall). It's a nice slim fit (and the waist cuff helps streamline it even more), but it's certainly not too tight. The only little thing: the neck opening is a bit snug. I like this from a fit perspective, but it does make getting it on and off him a bit tight (keep in mind, I did the hoodie version; I don’t think this would be an issue with the regular tee). It’s easier to flip it around and put his head in backwards and then flip it around to the front. When I make it again, I think I’ll cut the neckline just slightly bigger. But this is really no big deal.
The Charlie Tee & Hoodie is priced at $11.25. I know there are a lot of free patterns and tutorials online (which is awesome!), but it’s worth paying for a really great, well-designed pattern that you can use over and over again. I’ll certainly return to this one again, and will probably girl it up and make it for Georgia this fall, too! Oh, one last thing: If you're nervous about working with knits, check out Bonnie's blog post answering questions about sewing knits
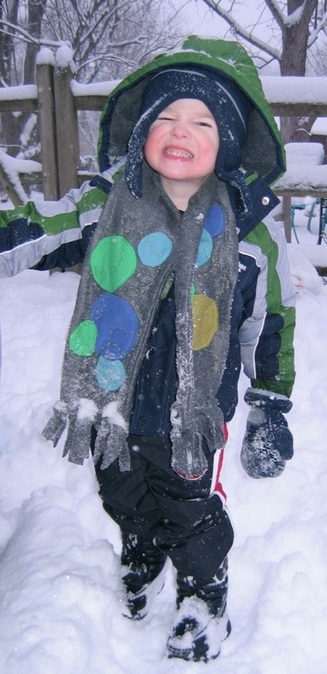
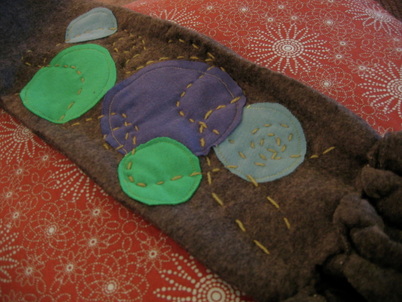
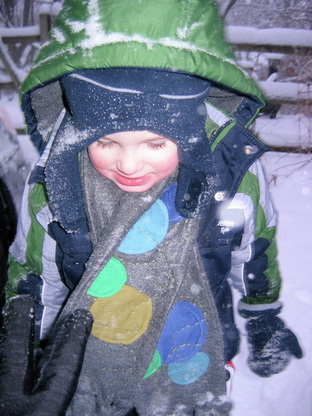
I don’t like winter, but I live in Cincinnati. So I’m pretty much out of luck. The only good thing about winter is the clothes—layers of fleecy, wooly, tweedy warmth. We bought Max his first real big boy winter coat a few months ago, along with hats, gloves, and boots. But it never occurred to me to get a scarf for him. So when I spotted this piece of grey fleece in my sewing basket one impossibly cold Sunday morning, I knew exactly what to do with it. The circles remind me of blowing bubbles, and I picked colors that would match his coat. I used all knit fabric, but you could use whatever is on hand (I actually think using a woven cotton and then fraying the edges would look really great). You could probably look at this and figure out intuitively how to do it. But here are the basic steps in case you want to know how I did it.
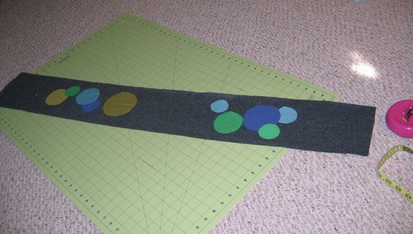
1. First, cut two pieces of fleece, each about 46 inches by 6-1/2 inches (or whatever length you want the scarf—I wanted some definite length).
2. Next, cut out a bunch of circles of different sizes and in different colors (trace whatever you have on hand to create circles).
3. Arrange your circles on the scarf front; keep at least 1/2-inch on each side (room for seams) and about six inches at each bottom (for the fringe). 4. To appliqué, you can use Wonder-Under. I think my Wonder-Under was too old (and ruined from spending the summer in my hot attic office), so instead, I just dabbed some fabric glue to hold the circles until I stitched.
5. I sewed around the circles with a basic straight stitch, because I wanted a rough, uneven look. But you could also do a zigzag or appliqué stitch. Or if you want a clean-edged look, follow Anna Maria Horner’s directions for super circles.
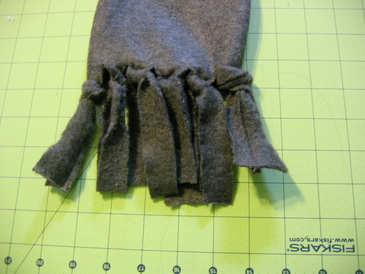
6. Sew up the sides of your two pieces of fleece (right sides together). Leave both ends open.
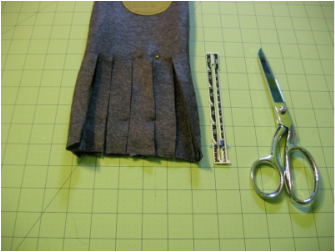
7. Turn and press well. 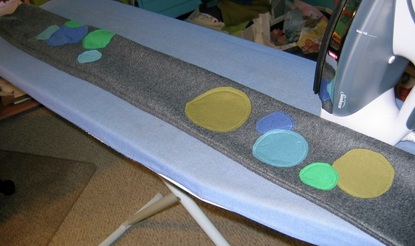 Don't forget to press after you turn so the scarf's side edges are nice and crisp. Ignore all of the crap in the background, please. 8. Align the rough edges at the ends and make four or five cuts about 5 - 6 inches deep, about 1 to 1-1/2 inches apart. 9. Tie the ends together to make fringe. Trimming the seam will help the end piece be less bulky. Don’t pull it too tight because it’s easy to stretch. My fringe is never perfect, so I just trim it until it’s even. (I’m sure there are more exacting ways to do this, but it’s for a wild toddler in the snow, so I’m not too worried.) 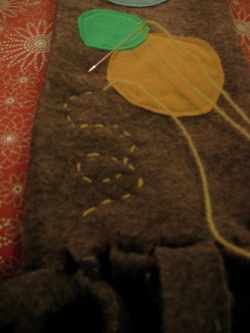 10. Add stitching detail. The stitching detail on the outside is actually my favorite part of this scarf! Last year, I won some pretty green yarn at Purl Soho (I was lucky enough to be there the day of their grand re-opening). I wasn’t sure what to do with it until I was trying to figure out how to add some more personality to this scarf. I decided to pull apart the strands and use a single strand (you pretty much have to use a needle threader to get it to go through the eye of an embroidery needle). I just freehanded the fun, curling stitches. (I’m not that great of a hand sewer, and it’s actually very easy to do.)
The hand-stitching looks good, and it holds the layers together. You could freehand some machine stitching of course, too.
May your winter be toasty!
|


 RSS Feed